Curse of the Hellsblade
| Curse of the Hellsblade | |
|---|---|
| ◄Eamon adventure #206► | |
 | |
| Authors |
John Nelson Tom Zuchowski |
| Created | 1983 |
| Released | March 1991 |
| Revised |
13 November 2000 (DOS) 14 November 1994 (ProDOS) |
| EAG number | 206 |
| EDX number | 04-18 |
| EDX set | The John Nelson Adventures |
| Native format | Apple DOS 3.3 |
| Files |
Eamon 206 - Curse of the Hellsblade.dsk Eamon 206 - Curse of the Hellsblade (ProDOS).dsk |
Curse of the Hellsblade is an adventure written by John Nelson in 1983 for his Knight Quest system and later adapted by Tom Zuchowski for use with the standard Eamon game system.
Premise
From the game's introduction:
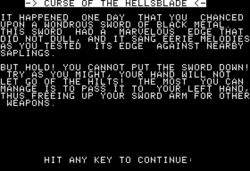
It happened one day that you chanced upon a wondrous sword of black metal. This sword had a marvelous edge that did not dull, and it sang eerie melodies as you tested its edge against nearby saplings.
But hold! You cannot put the sword down! Try as you might, your hand will not let go of the hilt! The most you can manage is to pass it to your left hand, thus freeing up your sword arm for other weapons.
Later that same day, you met up with a small band of companions, and showed them your new-found dilemma. One of the band who had some knowledge of such swords, told you that he recognized it as a weapon of Hell, and told you of a cave that is reputed to hold the key to lift its curse.
You listened closely as he told you how to find it. Perhaps you can find the answers to your problem there. Still, it is a marvelous sword, and you could do worse than be saddled with such an obviously magical blade. Your friends watched with interest as you readied it and prepared to demonstrate its edge on a nearby tree limb.
As you took aim at the limb, the sword began its strange song. You felt a tremendous surge of strength flow into your arm as you severed a 6-inch limb with one blow! And then, even before you knew what was happening, you swung about, and you watched in horror as the sword slew all of your friends! Its song grew deeper and stronger as it tasted the blood of each.
Even though you struggled with all your might, you could not control your body until all were slain! The sword pulsed with power, and seemed to be chuckling to itself.
You realized then that this blade is more than just cursed, but must in fact be possessed by a demon. And if that wasn't bad enough, you had a great deal of difficulty getting the black sword to let go of your sword hand so that you could transfer it to your left one.
It's clear that the sword is stronger than you, and if it drinks much more blood it will control you completely. Apart from that, it simply won't do to go about slaying everyone that you meet. Without a doubt, you must find that cave and rid yourself of the Curse of the Hellsblade!
Walkthrough
This walkthrough takes the player through every section of the caves in an order that maximizes the likelihood of collecting and keeping potential allies and minimizing backtracking. A similar walkthrough written by Tom Zuchowski was published in the December 2000 issue of the Eamon Adventurer's Guild Newsletter.

With the mighty Hellsblade in hand you're nearly unstoppable, but the sword has a mind of its own and will cut down friend and foe alike, so your first priority is to find a means of controlling it. Note that though there are occasionally hidden exits, there are always hints in the room description pointing to them, so it's not necessary to check every room for secrets.
Controlling the blade
- Enter the caves and follow the tunnel west, collecting the torch along the way.
- Check the small stone chamber to the north: you'll find a container of lamp oil and the diary of a man named John who previously suffered the curse of the Hellsblade.
- Continue to follow the tunnel west and then south, lighting your torch when it gets dark. Explore the two side chambers.
- The east chamber is occupied by a slime monster carrying a golden watch.
- The west chamber is home to some bats and a golden crown concealed in a pile of guano.
- Keep going south until you reach a four-way intersection.
- Go south to the temple and find concealed in the south wall an exit that leads to an organ room. Collect the Holy Gauntlets and put them on; the blade will no longer be able to attack on its own.
The eastern section
- Return to the intersection and follow the east tunnel.
- The first side chamber you pass contains a wolf and an old sword. You'll find that though you can still choose to attack with the Hellsblade, it won't attack automatically.
- Reach the four-way intersection.
- First explore north and check the side chamber where you'll find a couple of dwarves named Boagie and Hoagie who may join you. Where the tunnel ends, collect the miner's pick (important later) and a satchel of jewels, then return to the intersection.
- Next explore east and dispatch the zombie waiting in the tunnel. In the east chamber is the friendly adventurer Damlin and a silver box containing a letter from John; in the south chamber lies a black dragon guarding its treasure. Return to the intersection.
- Finally explore south. In the south side chamber is a ferocious grizzly bear and in the west a drunken man swigging whiskey from a bottle in a paper sack. Return to the intersection.
- Go back west to the original four-way intersection.
The western section

- Follow the tunnel west to a "T".
- Check the south room to find a diamond ring, a ruby (concealed inside the mounted heads), and a man named Sodloth.
- Return to the tunnel and follow it north to the next "T", ignoring for now the side chamber to the west.
- Go east and dispatch the lime monster.
- Go west and enter a vast, dark cavern. Make your way to the northwest corner when you'll find an old skull, and inside it a lump of gold.
- Continue west into a dimly-lit tunnel with doors north and south.
- First enter the north chamber (a paneled study) and go west through the secret door to find a crate, inside of which is a skeleton key.
- Next enter the south chamber (a lab) and find a secret passage concealed behind the table. Follow the passage an you'll reach a dingy chamber where you'll discover a hermit and a scrap of paper you can read. Doors lead west and south.
- The western door can be unlocked with your skeleton key; behind it lurks a Black Demon for you to battle.
- The southern door leads out of the caves and back home, but your mission is not yet complete so don't leave yet.
- Return to the dimly-lit tunnel.
- Follow the tunnel west. In the first side-chamber to the north lives a wizard with his potions and supplies. If you examine the wizard you'll see he has a small key, which he'll give you if you
requestit from him, or if he's not friendly you can simply slay him and take it from him. Use the key to open the cabinet and take the food pills inside. The potion is safe to drink and will heal your wounds. - Continue west to a "T" intersection.
- Take the north branch which leads to a pair of rooms: one is a dining chamber where you'll meet the fighter Reshkiv; the other is the bedchamber of the friendly Sunnun. Open Sunnun's dresser to discover a bag of gold coins.
- Return to the "T" and take the south branch.
- Dispatch Puglen and Gimkog in the dusty side chamber.
- Reach another "T" intersection.
- First take the western tunnel: it leads to a couple of rooms where you'll meet a friendly caveman and battle the dangerous pirate Gorgan Toad whose treasures you can loot.
- Take the eastern tunnel and check the east room to find a diamond and a paper.
- Continue along the tunnel south, slaying the trolls you find. Get the gold bars and open the trunk to reveal a golden axe. A secret room to the east hides some gold nuggets.
- Retrace your steps, back through the "T" intersections, along the dimly-lit tunnel, and into the large cavern.
The guardian's domain
- Find the pool in the southwest corner of the large cavern.
- Drop your torch so it won't get ruined, then swim down to the crevice at the bottom of the pool and collect the pearl from the giant clam. If you go any farther down you'll die, so instead take the shadowy exit west.
- Swim along the underwater tunnel, then up the water-filled shaft.
- Emerge into a small room and open the small chest to discover what must be Elizabeth's diamond necklace. Collect the lantern, put oil in it, and light it.
- Slip through the crack in the west wall and you'll be in a secret tunnel. Your way forward is blocked by a fallen slab, but you can
useyour miner's pickaxe to break it up. - Go west into the buried passage, then north into a tomb where a coffin lies. Open the coffin, defeat the demon Barbus, and seize his golden key.
- Enter the final chamber where John's Golden Guardian stands guard over a golden box. Per John's instructions, if you speak the right word ("Elizabeth") the Guardian will stand aside. Open the box with your key (be sure to specify the "golden box", since you're probably also carrying a silver one), get the sacred scabbard, put the Hellsblade inside it, and close it. Return the scabbard to the golden box, close it, then give the golden key to the Guardian.
- The evil blade is now safely under the Guardian's protection and you're free of the curse! Either exit through the magical portal to the north or return to the exit you found earlier, and your mission is complete.
The YouTube channel AppleAdventures posted a video walkthrough of the adventure in June 2021.
Reviews
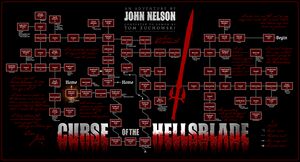
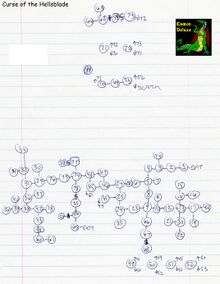
In his only published review, fellow Eamon author Phil Schulz gave Hellsblade an overall rating of 7.5, praising the adventure's coherent map and suitable amount of combat. Wrote Schulz: "It is a fun play that does not wind up requiring lots of play-through before you finally complete it." The review was published in the December 1994 issue of the Eamon Adventurer's Guild Newsletter.
Trivia
- Barbas is a demon lord described in the Ars Goetia, an anonymous 17th century grimoire.
- The Eamon Gazetteer by Pat Hurst describes a sword similar to the Hellsblade: known as Seeker, "it is sentient and drinks the blood of its victims."
External links
- EAG Online: Master List
- Eamon Adventure Browser: Curse of the Hellsblade
- Eamon Adventurer's Guild Online
- The Interactive Fiction Database: Curse of the Hellsblade
- Interactive Fiction Reviews: Curse of the Hellsblade
| |||||||||||
| |||||||||||
| ||||||||
- Adventures by John Nelson
- Adventures by Tom Zuchowski
- Adventures by multiple authors
- Adventures in caves and dungeons
- Adventures released in 1991
- Adventures set on Eamon
- Adventures with quests
- Apple adventures
- Eamon adventures
- Eamon Remastered adventures
- Fantasy adventures
- Knight Quest adventures
- Version 7 adventures