The Caves of Treasure Island
| The Caves of Treasure Island | |
|---|---|
| ◄Eamon adventure #13► | |
 | |
| Authors |
Paul Braun Geoffrey Genz |
| Created | 1980 |
| Released | c. 1981 |
| Revised | 30 October 1984 |
| EAG number | 13 |
| EDX number | 13-02 |
| EDX set | Classic Eamon Adventures, Vol. 1 |
| Native format | Apple DOS 3.3 |
| File | Eamon 13 - The Caves of Treasure Island.dsk |
The Caves of Treasure Island is an Eamon adventure written by friends Paul Braun and Geoffrey Genz. Though it's the only adventure the two co-authored, each individually wrote an adventure of his own: Dracula's Chateau by Braun and The Caverns of the Sphinx by Genz. The adventure is notable for its graphical map, musical effects, and other custom features.
Background
In correspondence with Huw Williams in 2020, Genz recalls first encountering Eamon in 1980 when he got a couple of game disks from a Denver-area Apple computer club, and soon picked up four more. Genz and his friend Paul Braun played these six Eamon disks "obsessively" and were inspired to try creating their own adventure.
Writes Genz:
If I had to guess I'd say we started it the summer between 9th and 10th grades [1980], but it could have been during our sophomore year. Obviously it was also before there were any real tools for developing your own, so that and our other two were crafted completely by hand... I know we dissected the Lemonade Stand game to figure out how to do the music by POKEing the right addresses for the speaker.
Once the adventure was complete, the two delivered The Caves of Treasure Island to the local club, and from there it made its way into the collection of the National Eamon User's Club.
The 2.5-second musical effect that plays when the adventurer uses the flute is a rare example of sound in an Eamon adventure and consists of 11 descending notes repeated twice, followed by 20 ascending notes. The effect was not included in the later Eamon Deluxe version of the adventure.
Premise
The game opens with the following introduction:
The Adventurers Guild has elected you to rescue a captured adventurer. Recently the guild received a note in a bottle asking for assistance. The author explained that he had been taken captive on Treasure Island by pirates. Unfortunately, the exact location and name of the unlucky adventurer were destroyed by sea water. However, in the bottle was the following map.
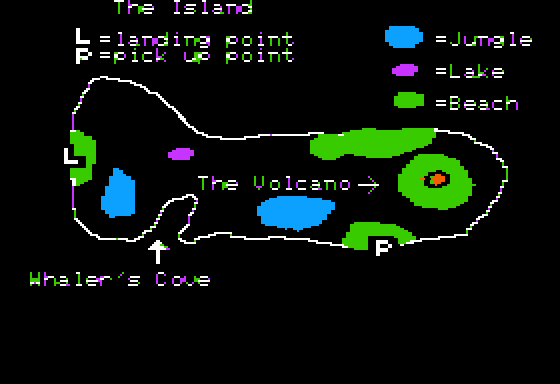
A word of caution: legends tell of hidden caverns with one-way passages and tunnels under the surface of the island. Also the water around is infested with man-eating sharks.
A ship will drop you off on the ship but it has other duties. Another is scheduled to land on the south beach soon after you are dropped off.
**** Good luck ****

You begin on a sand bar on the west side of the island, the ship that delivered you having just departed.
Walkthrough
To successfully complete The Caves of Treasure Island you must collect a few necessary items in the right order; this walkthrough lets you collect those pieces, potentially make some early allies, and experience every (survivable) feature, but since there are three western entrances to the tunnels and multiple connections from point to point, it's only one of several possible approaches.
The rooms you'll be making your way through are dangerous and contain multiple death traps, so proceed with care. Note too that the Deluxe and Remastered versions of the adventure start you with a companion, Terry the Pirate, a chatty and inebriated sailor who'll accompany you as you explore. These updated versions also feature occasional, quippy asides added to some of the descriptions by Deluxe creator Frank Kunze ("FK").


Gathering allies and artifacts
- From the sandbar, head east to the beach, then continue on to a clearing where trails lead off in all directions. (Drinking the potion in the bottle you collect on the beach produces unpredictable results.)
- First take the south trail to the bend where you'll find a shovel.
- Return to the clearing and start along the north trail.
- Step east into the quicksand. You'll start to sink, but
say helpand a friendly hermit will arrive in the nick of time to save you. - East is the hermit's hut where digging with your shovel in a patch of disturbed earth reveals a secret stairway down. It's best to avoid this entrance for now, though, since you first need to find some other necessary artifacts. Also ignore the east exit: it leads only to a deadly tiger trap. Return west across the quicksand with the hermit.
- Do not go any father north since the trail leads only to immediate death in the pirate's lair. Instead, return to the clearing.
- Take the east trail, then go south and fight One-Eye the Pirate, who'll drop a flute when defeated — an important item that will help you later!
- Step east and encounter the possibly friendly cannibals Consu and Magali. (Further east is the way to your ship, which you'll take when you're ready to depart.) Return west to the trail.
- Go south to where a rope goes hangs down cliff. Collect the empty silver chest, then climb down into the lava tube.
Exploring the tunnels
- North is a large chamber with exits in all directions. The lava tube leading north is a dead-end, so check the east room first (the one marked "keep out"): you'll wake the aggressive Bluebeard and find ally Maria. Defeat Bluebeard and collect his magic axe.
- Return to the large chamber and take the west passage. Be sure to take the small torch off the wall.
- Follow the passage as it turns north, lighting your torch for illumination.
- In the astronomy room collect the valuable telescope.
- Continue north, stopping at the kitchen to battle Cooky and take his silver skillet.
- Continue north, through the toilets and into the powder room where you can grab a (non-functional) musket.
- Go east to an intersection and check the north room; kill Gunny the cannoneer and find a golden cannonball.
- The route farther east is blocked by a locked door with a sign that reads, "Beware the spirit of Etulf Yalp!" Play the flute and the door will open.
- East is a pair of detention rooms where you'll find a friendly wizard whom the pirates were keeping prisoner. Again play the flute to open the next locked door and continue east.
- Go east into a large chamber, then north to a torture area where a poor sailor named George is being whipped. Defeat Brutus the torturer, free the sailor, hand him a spare weapon if you have one, and collect the chains.
- Return to the large chamber and head east into a jewel-filled room.
Battling monsters
This small section isn't necessary to complete the mission, but if you're a strong character with multiple allies you can gain some good combat experience and valuable loot.
- Climb the steep slope out of the jewel room and emerge outside.
- Follow the trail north then east to a beach where you can battle a lava monster.
- Head south into the volcano where a huge dragon is enjoying a lava bath. Defeated, it will drop a key you can use to open the Japanese chest, inside which are doubloons and a magic harp that you can play to heal your party. You can also grab a powerful crossbow.
- Return to the jewel room.
Freeing the adventurer
- From the jewel room, go west to the large chamber and drop down the slope.
- The door leading south is locked but again, as the poem suggests, playing your flute will open it.
- In the prison cell, free the chained man who will introduce himself as Genzenbraun, the Free Adventurer who wrote the message in the bottle!
Escape
- The slope it too steep for you to climb back up, but you can exit east through a door that will lock behind you.
- Climb up into a dirty chamber and battle Captain Hook. Ignore the east exit (which leads only to the confusingly-connected "mental torture" chambers) and instead go west.
- Climb the slope, go west to the cave entrance, and west again to re-emerge onto the surface.
- Go south and you'll see the path leading to your ship. Follow it east and south, cross the gangplank, and you'll set sail for home.
Reviews
EAG president Tom Zuchowski writing in the June 1995 issue of the club newsletter gave Caves of Treasure Island a mixed review, praising its many nice touches and special effects but also saying he disliked the many death traps and the need for guesswork and trial-and-error to complete the mission. Zuchowski gave the adventure an overall rating of 5/10, with a 6/10 for difficulty.
Location
The location of Treasure Island relative to the Main Hall is unknown, though the fact that Genzenbraun's message in a bottle came successfully back to the Guild may suggest it's not terribly remote. The island in the later adventure Furioso by William Davis is unnamed and may be Treasure Island.
Trivia
- Bluebeard is a murderous character who first appears in a 17th Century French folktale.
- Captain Hook is a fictional pirate and the main antagonist in the 1904 play Peter Pan by J. M. Barrie.
- The pirate One-Eye is based on the stereotype of pirates wearing an eyepatch.
- Genz and Braun hide the instructions for opening certain doors in the backwards phrase "Etulf yalp" ("Play flute"); a similar reversed clue appears in the earlier adventure Lair of the Minotaur by Donald Brown, where saying "Cigam" backwards ("Magic") frees a gem from a stone.
External links
- EAG Online: Master List
- Eamon Adventure Browser: The Caves of Treasure Island
- The Interactive Fiction Database: The Caves of Treasure Island
- Interactive Fiction Reviews: The Caves of Treasure Island
- Adventures by Paul Braun
- Adventures by Geoffrey Genz
- Adventures by multiple authors
- Adventures in caves and dungeons
- Adventures on islands
- Adventures released in 1981
- Adventures set on Eamon
- Adventures with images
- Adventures with quests
- Adventures with sound
- Apple adventures
- Eamon adventures
- Eamon Remastered adventures
- Fantasy adventures
- Version 4 adventures