The Tomb of Molinar
| The Tomb of Molinar | |
|---|---|
| ◄Eamon adventure #11► | |
 | |
| Author | Donald Brown |
| Released | 1980 |
| Revised | 16 October 1988 |
| EAG number | 11 |
| EDX number | 02-05 |
| EDX set | The Donald Brown Adventures |
| Native format | Apple DOS 3.3 |
| File | Eamon 11 - The Tomb of Molinar.dsk |
The Tomb of Molinar is an early Eamon adventure and the sixth written by series creator Donald Brown.
Premise
The introduction opens with the King briefing the adventurer on his mission:
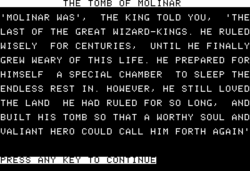
"Molinar was", the King told you, "the last of the great Wizard-Kings. He ruled wisely for centuries, until he grew weary of this life. He prepared for himself a special chamber to sleep the endless rest in. However, he still loved the land he had ruled for so long, and built his tomb so that a worthy soul and valiant hero could call him forth again.
"Our need is great.
"The enemy has summoned forth a being of great power. If the being runs unchecked our kingdom is certainly doomed, possibly all on this globe as well. None of our people alive can stop this creature. Our only hope is to call upon our great past leader. You must find the tomb, enter it, and bring back our savior."
So the King ordered you, and so you set out. After weeks of searching, you have found the tomb. The magical paper tells you that things are desperate. You can't go for help. You must enter the tomb alone. Good luck!
You begin your mission at the entrance to Molinar's tomb.
Walkthrough

Main level
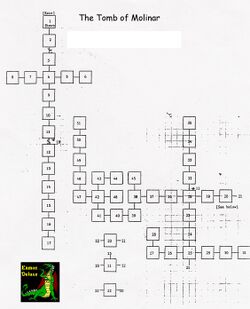
Walk south into the tomb until you reach the first intersection: the east corridor leads to a chamber with five hissing snakes, the west to a small room containing an axe, a bag of gold pieces, and a strange mirror that shows a figure not in the room with you. Don't take mirror: if you try, you'll be pulled inside it and trapped. Instead, hit the mirror and you'll release a friendly adventurer who'll join you.
Continue south down the main corridor to a glowing chamber with a huge ebony coffin. Before opening the coffin, examine it to reveal a hidden button and hit it to open a secret door in the south wall. Next, open the coffin to reveal a ladder leading downward into some caverns.
Before venturing down the ladder, go south down the secret corridor to where it widens and you'll find an elderly person bound by a heavy chain: if your character is male, the prisoner will be an old crone named Lycernia; if female, an old man by Lycium. Freed, the individual will grow young and beautiful and will accompany you. Take the chain, return to the coffin room, and descend into the caves.
Caves
At the bottom of the ladder you'll be at a four-way intersection with tunnels leading in every direction.
- The east tunnel leads only to a confusing loop and is best avoided.
- South is a T-intersection with short side tunnels that lead west (to a chamber where you can collect a net) and east (to a chamber inhabited by three grumpy bears).
- The corridor west splits to pass around a large chamber which you can enter from the west, inside which stands a gleaming sword embedded in a stone... but attempting to take the sword reveals it's actually a mimic in disguise. Further on the tunnel bends north and leads to the treasure-filled lair of a large and dangerous dragon. If you're a strong and well-armed character you may slay it, or if you're carrying the net you can capture it; otherwise, seize all the treasure, withstand the dragon's first attack, and then flee. If you enter the tunnel north of the dragon's lair, keep going to the end where you'll find the scrambled word "Aemno" scratched on the wall; saying "Eamon" will magically return you back to the tomb's entrance.
- North the tunnel leads past a sign ("A wizard is bound only with power. Woe to those who would free it.") and into a chamber where a wizard lies gagged and bound with glowing green ropes. If you free him, he'll tell you he's the great wizard king Monimar and will accompany you... but beware, and definitely do not leave the tomb with him.
Molinar's chambers
Return up the ladder to the coffin room and take the secret corridor south, past the widening section, and ultimately to a large antechamber occupied by a massive stone guardian who'll bar your way forward. Attack it repeatedly with your most powerful weapon, ignoring any damage you receive, and it will eventually stop moving and allow you to pass through the door to the south.
In the inner chamber lies Molinar himself, sleeping peacefully with a book, a golden scepter, and a green potion by his side. Collect these items and give the potion to Molinar to wake him. Learning of the kingdom's plight, he agrees to come with you and save the land from the enemy. If Monimar is with you when you wake Molinar, Molinar will kill him, explaining that he was the most evil wizard ever born (and agreeing not to tell anyone that you mistakenly freed him).
Your mission is complete! After returning to the Main Hall, the King rewards your success with a number of gold pieces equal to 100 times your charisma.
Alternatively: if you foolishly leave the tomb with the impostor Monimar, his evil experiments will destroy you, the world, and everyone in it, which the game simulates by wiping every living character from the master disk.
Trivia
- If you get trapped in the mirror, the game will record your character in the
MIRRORtext file on the diskette. - The large net marked with the words "dum-de-dum-dum" is a reference to the ominous, four-note introductory theme of Dragnet, a police procedural series on radio and television.
- A similar musical sound effect plays when the adventurer successfully uses the net to capture the dragon:
External links
- EAG Online: Master List
- Eamon Adventure Browser: The Tomb of Molinar
- The Interactive Fiction Database: The Tomb of Molinar
- Interactive Fiction Reviews: The Tomb of Molinar
| ||||||||