Walled City of Darkness
| Walled City of Darkness | |
|---|---|
| ◄Eamon adventure #150► | |
 | |
| Author | Tom Zuchowski |
| Released | June 1988 |
| Revised |
6 December 1989 (DOS) 23 January 1992 (ProDOS) |
| EAG number | 150 |
| EDX number | 05-04 |
| EDX set | The Thomas Zuchowski Adventures |
| Native format | Apple DOS 3.3 |
| Files |
Eamon 150 - Walled City of Darkness.dsk Eamon 150 - Walled City of Darkness (ProDOS).dsk |
Walled City of Darkness is an Eamon adventure written by Tom Zuchowski and released in June 1988. Parts of the adventure are based on features and settings in Creatures of Light and Darkness, a novel by Roger Zelazny.
Background
In his author's notes, Zuchowski writes that Walled City of Darkness, his fourth adventure, is the first one in which he intended to use mostly just the standard Eamon functionality without a lot of massive customization; however, after running out memory before completing it he still had to make a number of changes (and cut some unnecessary features) in order to fit everything in. The adventure includes eight new commands and, by Zuchowski's count, eight separate, challenging puzzles.
Premise
Feeling strangely uneasy, you pay a visit to the itinerant seer Oracle Jones to see if he can identify the source of your worry. After unlocking his powers with doses of alcohol, Jones relays his vision: Hokas Tokas has set up shop in the city of Lumen but now is in danger and urgently needs your help.
| Full introduction and notes |
|---|
|
For the last day or so, you had been beset by feelings of uneasiness that you could not put a name to. And so it happened that you searched through the rooms of the Main Hall for an itinerant seer by the name of Oracle Jones. Now, some say that Jones has no talent, but is merely a derelict cadging free whisky from the gullible. But you know better. You have seen what he can do when he has had a good belt to clear his vision. You find him seated at a table near the back bar. "My friend!" he cries, "I have had a vision! I have news, my friend! News for you! Now, what was it..." As he strains to remember, you catch him peeking at you from the corner of his eye. Without a word, you slap a gold piece on the bar, and without a word, the barkeep hands you a bottle of rye. Silently, you splash some into a glass and set it in front of him. In a shot, Oracle grabs the glass and drains it in a single gulp. His eyes fly open! "I see it! I see it!" he cries. "It's a message from ol' Tokas! He's in a mess o' trouble!" Now, this is news; and even as Oracle Jones says it, you know with a catch in your throat that this is the source of the uneasiness that has plagued you. He begins to strain again, struggling to see more, as he pushes the empty shot glass back to you. And without a word, you refill it. He gulps it down, and again, his eyes fly open! Oracle gabbles, "Yes! Yes! I can see it clearly now! Tokas is in a bad way fer sure, an' he needs your help! He says to hurry!" He's on a roll now. Quickly, you pour him another drink. Without looking down or even seeming to notice you, Oracle Jones knocks it back. "He says, he says to come to the city of Lumen where he's set up shop! He says, look for him near the south gate! Hurry, he says!" That's good enough for you. You set the bottle on the table in front of Oracle Jones, and without once having said a single word, turn and hurry away. It sounds like Hokas Tokas is in real trouble. You throw a few weapons together, and force a quick march to the city of Lumen. It looks peaceful enough from outside, but when you pass through the open north gate you are instantly plunged into pitch darkness! You cannot move, but are held by an unseen, dark power! You can feel it pawing though your things. Though you cannot hear it, you can sense its thoughts: "Gold! You bring me gold, my pretty one! And what's this? Magic weapons? Oh, ho! Ho! Hoho! Hohohohohoho-" In that instant you feel the familiar presence of the mind of Hokas Tokas. Your senses reel... Author's notes Welcome to my fourth Eamon adventure! This was to be my first Eamon that did not undergo massive changes; I intended it to be a straight version 6.2 dungeon with some extra commands added. You can imagine my chagrin when OUT OF MEMORY appeared with the program only 95% written. It then became necessary to turn to the "Hack-and-Slash" school of programming: everything not essential was deleted. I also shortened several variable names (ROOM to RO, AD%() to A%(), and so on). I am beginning to suspect that I may be incapable of writing an Eamon without stirring things up with an axe! There are a number of new commands:
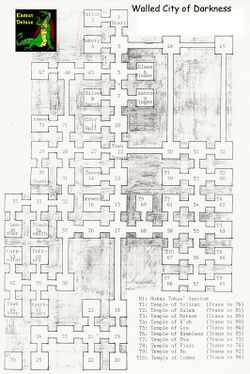
The LOOK command will not find any secret passages or artifacts for you. Its only use is to re-examine room descriptions. However, there are artifacts embedded in room descriptions to be found using the EXAMINE command. You will never see more than one monster at a time. Therefore commands like GIVE, REQUEST, & PAY do not allow you to name the monster. Type the command andthe object only. (eg: GIVE SADDLE) Other modifications to standard commands will become apparent during play. The commands WEAR, DRINK, and PUT will not normally require you to GET an artifact first, but will work with artifacts lying around the room as well. Among the many items you may purchase are forecasts from the astrologer. These are hints that might help you if you get stuck. Since they are hints, I would suggest that you try solving the puzzles without them, for your own satisfaction and to save money. Be frugal! This advice is not cheap, and you will need a minimum of 190 GP to complete the quest. A recurring puzzle is to determine what kind of weapon will destroy certain supernatural opponents, so watch the hit results closely, and think hard about which shops could supply you with an appropriate weapon. For example: think about what you could make a sword from that might damage a creature made from light. The maze may seem insoluble, being made up of 36 rooms and a real pain to map, but it is not; a powerful hint is given in one place. Watch for it. It may seem like you can't die in this adventure. Let me assure you that you can die at the hands of any of your enemies. Don't worry about losing your "big gun" weapons, or your gold. You will have the opportunity to recover everything before you return to the Main Hall. If you want to use DUNGEON.EDIT, use the option menu to load the parameters for special artifact types. The file name is PARAMETERS. Readers of Roger Zelazny will recognize a close resemblance between Lumen and the main character of his Creatures of Light and Darkness: Sun-Eyed Set, Destroyer of Suns. They will also notice that I shamelessly stole most of the cathedral from the same source, especially the prayers. I hereby acknowledge doing so; Zelazny is one of my favorite authors. Others might recognize Oracle Jones from the movie The Hallelujah Trail. I wish to acknowledge the source of the multiple-save routine: Dan Knezek's excellent Eamon adventure, Dungeon of Doom. You will find that this is not a quicky 30-minute Kill & Loot scenario, but you should be prepared to spend many hours working out the puzzles, in the spirit of the Great Underground Empire, or the Colossal Cave. By my count, there are at least eight puzzles to be solved here. Several of them interlock, and several have nested minor puzzles that must be solved first. I hope that you enjoy it. Tom Zuchowski |
Walkthrough

In the March 1996 issue of the Eamon Adventurer's Guild Newsletter, Zuchowski introduced a new column titled "Eamon Walk-Through" which would give step-by-step instructions on how to solve challenging adventures, and for his first walkthrough he chose Walled City of Darkness. His instructions begin with some general hints that players can use if they want to try to solve the adventure themselves, and then moves into the detail steps needed to save Tokas and the city of Lumen.
Trivia
- Oracle Jones is a character from the 1965 Western movie The Hallelujah Trail.
External links
- EAG Online: Master List
- The Interactive Fiction Database: Walled City of Darkness
- Interactive Fiction Reviews: Walled City of Darkness
| |||||||||||