The Lair of the Minotaur
| The Lair of the Minotaur | |
|---|---|
| ◄Eamon adventure #2► | |
 | |
| Author | Donald Brown |
| Created | 1979 |
| Released | c. 1980 |
| Revised | 15 December 1984 |
| EAG number | 2 |
| EDX number | 02-01 |
| EDX set | The Donald Brown Adventures |
| Native format | Apple DOS 3.3 |
| File | Eamon 2 - The Lair of the Minotaur.dsk |
The Lair of the Minotaur is an early Eamon adventure written by Donald Brown.
Background
This is the second Eamon adventure and the first outing not explicitly meant for beginners. It was released probably in late 1979, with or shortly after the debut of the Eamon system itself, and is the first to include features such as buried items and locked doors.
Premise
You've arranged to meet your girlfriend Larcenous Lil (or in the case of a female adventurer, your boyfriend Slippery Sven) in the town of Dunderhaven. When you get to town you learn that Lil, who arrived before you flat broke, tried to get some cash by burglarizing a nearby castle and hasn't been seen since.
You go to the castle after her, but once inside you're ambushed by bowmen under the command an ugly man on a throne who takes you for another thief and casts you down a shaft to meet the same fate as Lil. After a long drop and a "thud", you find yourself unhurt but with no way to climb back up the shaft, and so must venture into the tunnels beneath the castle.
Walkthrough
.png)
- Pick up the lantern and take the exit south, which opens onto an east/west tunnel.
- Go west to find a short north/south hallway with rooms on each end. In the north room is a coffin containing an animate skeleton that leaps out when you open the coffin; defeat him and take the skeleton key he drops. In the south room is an enormous stone, and the word "cigam" in a mirror; saying the word backwards ("magic") will make an emerald pop out of the stone.
- Return to the first tunnel and head east, where it opens onto the middle of a beach along a swift, south-flowing river. The beach continues south (where you find an empty bottle), but the way forward is north where a large boat rests on the bank. Enter the boat and go east onto the river.
- Riding the boat south takes you back past the beach, then through a tunnel, and then into a cliff-lined stretch of river. The cliffs prevent any landing to the east, but three empty grottoes open to the west and you can exit into any of them. (You'll encounter a killer bunny in the river outside the middle grotto.) If you take the boat all the way to the south grotto, you must exit there—following the river further south into the next tunnel will smash your boat into a grate and you'll be killed.
- Each of the three grottoes open onto west-bound tunnels, all of which converge at a four-way intersection guarded by a black knight whom you must defeat. South of the intersection you'll also encounter the friendly "wandering minstrel eye".
- Continuing west you'll reach another four-way intersection. The westbound tunnel is the way forward, but explore the north and south ones first:
- The northbound tunnel:
- This tunnel leads to a T-intersection with an east/west one. East is a single chamber where you find a cloth bag; carrying the bag grants you the ability to carry much more weight than normal.
- To the west the tunnel bends north and leads first to "Witt's End", then finally to the "Insanity Room", a strange, illogical place where all the room's exits (save one) lead back to itself. West is the true exit.
- Return south to the four-way intersection.
- The southbound tunnel:
- This tunnel leads to the "Temple of Kalimar", which has two sets of side-corridors that branch off to the east and west.
- Following the first side-corridor east takes you to a supply room where you find a shovel—if you return with the shovel to the south grotto, you can dig to find a bag of one hundred gold coins. Following the corridor west takes you to a small room containing a jewel on a stand marked "Jewel of Molinar -- do not touch!" You can take the jewel, but doing so will deal you a damaging electrical shock.
- The second side-corridors leads east to the temple's treasury (where you find 5,000 silver coins) and west to the room of the high priest. Defeat the high priest and take his books and morning star.
- Finally the tunnel reaches the temple's chapel, where Larcenous Lil (or for female adventurers, Slippery Sven) is chained to an altar and guarded by a priest. Defeat the priest, take the loot, and free Lil.
- Return north to the four-way intersection.
- Going west your way is blocked by an iron gate; unlocking it with the key obtained from the skeleton will make it fall into dust.
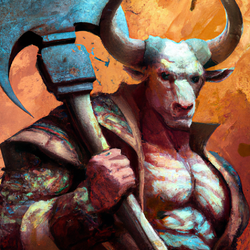
"You see before you a minotaur, straight out of the legends..." (DALL-E 2) - Beyond the gate you find a smithy and a hammer-wielding blacksmith. Defeat the blacksmith and (if you have the strength to carry it) take his valuable golden anvil.
- The smithy is the beginning of a maze of generally featureless and labyrinthine corridors designed to confuse you, and which sometimes connect in deliberately confusing or circular ways. From the blacksmith's shop, go north twice, then west twice, then north twice, then west four times, and you'll be at the south end of a corridor that is your way forward.
- Continue north and in a large chamber you'll find the titular Minotaur, a strong enemy armed with a battleaxe. Defeat him, take his axe, and exit north.
- Following the tunnel north you emerge outside into some bushes, with a clearing to the north where you encounter a gypsy. Keep going north along the road to reach the Main Hall.

Reviews
The Eamon Adventurer's Guild reports a rating for the adventure of 4.5 out of 10, the average of six ratings. Reviewer Tom Zuchowski gives Lair a rating of 5, describing it as an "advanced Beginners Cave" and a "pretty good second adventure."
Location
This adventure begins in the town of Dunderhaven but ends just outside the Main Hall, the intervening distance being covered entirely on foot or by relatively short trips in a boat, all leading generally south. This likely places Dunderhaven a short distance north of Eamon Town.
The river in this adventure is not explicitly named but occupies the same relative location (within walking distance of the Main Hall) and flows in the same direction (south/southeast) as the Zyphur River featured in The Zyphur Riverventure, an early Eamon story created by Jim Jacobson.
Trivia

- The Minotaur and his maze reappear in Robert Parker's The Forbidden City, and the elderly Minotaur features in Frank Black's Fiends of Eamon. Minotaurs also feature as monsters in various other adventures, including Dungeon of Doom, The Boy and the Bard, The Creature of Rhyl, Eamon Renegade Club. and Return of Ngurct.
- The Ice Cave by Jon Walker also features the adventurer's girlfriend, referring to her instead as "Lovely Lil".
- Larcenous Lil plays a role in the storyline of the Eamon Deluxe adventure A Runcible Cargo.
- The "killer bunny" encountered along the river is likely a reference to the Killer Rabbit of Caerbannog from the 1975 motion picture Monty Python and the Holy Grail.
- The disembodied "Wandering Minstrel Eye" is a play on the title of the song A Wand'ring Minstrel I from The Mikado, an 1885 comic opera by Gilbert and Sullivan. Brown may also have meant it as a reference to the beholder, a creature from Dungeons & Dragons shaped like a large floating eye; Frank Black made this explicit in Fiends of Eamon, stating that a Wandering Minstrel Eye is also called a "Singing Beholder".
External links
- EAG Online: Master List
- Eamon Adventure Browser: The Lair of the Minotaur
- The Interactive Fiction Database: The Lair of the Minotaur
- Interactive Fiction Reviews: The Lair of the Minotaur
- Renga in Blue: Eamon: The Lair of the Minotaur
- Eamon on JAVA
| ||||||||