Treasure Island
| Treasure Island | |
|---|---|
| ◄Eamon adventure #215► | |
 | |
| Author | Margaret Anderson |
| Released | March 1992 |
| Revised | 31 December 1991 |
| EAG number | 215 |
| EDX number | 15-19 |
| EDX set | Classic Eamon Adventures, Vol. 3 |
| Native format | Apple DOS 3.3 |
| File | Eamon 215 - Treasure Island.dsk |
Treasure Island is an Eamon adventure written by Margaret Anderson.
Background
Anderson wrote and submitted Treasure Island in 1991. Tom Zuchowski announced the adventure's release in the March 1992 issue of the Eamon Adventurer's Guild Newsletter, and noted that Anderson had written the adventure specifically for the enjoyment of her eight-year-old nephew.
Premise
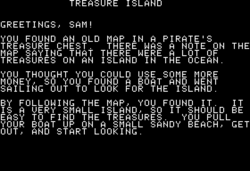
You find an old map in a pirate chest indicating that treasure is to be found on a small island in the ocean, so you sail out to look for it. Locating the island, you pull your boat up onto the sandy beach and begin your search.
Walkthrough

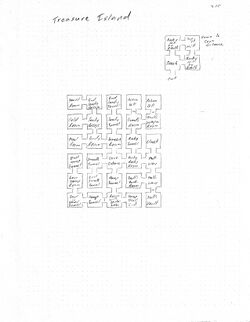
You begin on a sandy beach with your boat to the south.
- Go north from the beach and collect the flashlight.
- Go east and you'll reach the hilltop, and a ladder that leads down into a cave. Descend the ladder.
- At the bottom you'll find yourself at the intersection of four tunnels leading north, south, east, and west.
LIGHTyour flashlight and take the east tunnel first:- Enter the dirty chamber to find a man named Tom battling a troll. Tom says he's there to find and rescue his friends, and asks for your help. Join the fight and dispatch the troll.
- Go north through the rocky tunnel until you come to the guard room. Defeat the troll guard and collect his iron key. The small room behind the wooden door the north is a cell, inside which is the first of Tom's friends, a man named Harry.
- From the guard room, go east into the weapons room where you can collect a variety of armaments. (Unarmed members of your party may also pick up a weapon.) The wooden door to the north leads to another cell where you'll find the third member of the party, Dick.
- Retrace your steps back to the dirty room, then go east into a hallway. To the north is a closet where you'll find the chainmail-clad, silver-spear-wielding Helen. Go south to find that the hallway ends in a locked steel door guarded by another troll.
- West is the trolls' bunkroom where you'll find another human named Bill.
- South beyond the steel door (which you can open if you carry the iron key) is the trolls' treasure vault.
- Return to the four-way intersection.
- Next go west:
- In the smooth tunnel you'll run into a pack of a dozen large rats, which your party can hopefully dispatch without much difficulty.
- Go south to the end of the tunnel to find a silver key.
- Return to the four-way intersection.
- Next go south:
- A damp tunnel leads to a room full of spiderwebs and a large hungry spider that you must defeat.
- Go east into a dead-end chamber where you'll find the skeletons of the spiders' victims — as well as a gold ring and a bottle of healing potion.
- Return to the spiderweb room and open the iron gate (using the silver key).
- Go west along the damp passage, turn north into a damp room, and kill the two spiders hanging out there.
- Go north to the end of the tunnel to find a note and a wizard's hat.
READthe note: it describes how to get rid of dragons. Get the hat andWEARit. - Return to the four-way intersection.
- Finally, go north:
- You'll enter a large scorched chamber dominated by an enormous — but fortunately very sleepy — dragon. It won't attack your party, but it blocks the exits north and west so you'll have to get rid of it somehow. Per the note,
SAY DRAGON VANISHthree times and the creature will disappear. - North from the dragon chamber is a short sandy tunnel, at the end of which sits a chest. Open it to find some gold coins.
- West from the dragon chamber is a sandy room with some silver dollars, and an exit that leads further west.
- Go west into the dragon's pearl room and gather the valuable pearls.
- Return to the sandy room and take the north passage.
- Go west into the dragon's gold room and take the gold necklaces and jewelry.
- Return to the passage and go north again.
- Go west into the dragon's jewel room and take (yes) the jewels.
- Return to the four-way intersection.
- You'll enter a large scorched chamber dominated by an enormous — but fortunately very sleepy — dragon. It won't attack your party, but it blocks the exits north and west so you'll have to get rid of it somehow. Per the note,
- Climb back up the ladder, return to the beach, and step south into your boat to return to the Main Hall.
Review
Tom Zuchowski reviewed Treasure Island in the March 1992 Eamon Adventurer's Guild Newsletter, assigning it an overall rating of 6 out of 10. He praised the adventure as being well-written and free of errors, and complimented its half dozen special effects, but noted that its 30-minute playing time was short and its puzzles quite simple. However, despite rating it a 3 out of 10 for difficulty, Zuchowski described it as the best game of that difficulty level that he'd ever played, and recommended it for young Eamonauts.
Location
Treasure Island is situated far out to sea and its relationship to other locations is unknown. Anderson describes it as "very small"; the size suggests it is not the same one featured in Caves of Treasure Island, though it could be in the same area.
Trivia
- Tom, Dick, and Harry are names sometimes used together as a synonym for an unspecified group of people.
External links
- EAG Online: Master List
- The Interactive Fiction Database: Treasure Island
- Interactive Fiction Reviews: Treasure Island
| |||||||||||