Return of Ngurct
| Return of Ngurct | |
|---|---|
| ◄Eamon adventure #210► | |
 | |
| Author | Hoyle Purvis |
| Created | 6 June 1991 |
| Released | December 1991 |
| Revised | 4 October 1991 |
| EAG number | 210 |
| EDX number | 17-04 |
| EDX set | Classic Eamon Adventures, Vol. 5 |
| Native format | Apple DOS 3.3 |
| File | Eamon 210 - Return of Ngurct.dsk |
Return of Ngurct is an Eamon adventure written by Hoyle Purvis and released in December 1991. The story is a sequel to The Temple of Ngurct created by the Plamondon brothers in 1982.
Premise
The story begins some time after the adventurer's earlier mission to the citadel, which ended successfully with the apparent destruction of the demon Ngurct's golden medallion:
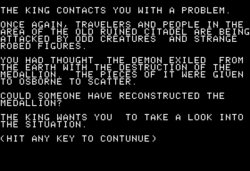
The king contacts you with a problem.
Once again, travelers and people in the area of the old ruined citadel are being attacked by odd creatures and strange robed figures.
You had thought the demon exiled from the earth with the destruction of the medallion. The pieces of it were given to Osborne to scatter.
Could someone have reconstructed the medallion?
The king wants you to take a look into the situation.
To help you, he has sent runners to find and enlist the aid of those who helped you fight Ngurct before.
This time the king wants you to wipe out the cult members, recover the reconstructed medallion, & destroy the demon Ngurct.
The king will give you 5,000 gold pieces upon the successful completion of your task.
You travel to the mountain pass and arrive at the entrance to the citadel.
Walkthrough
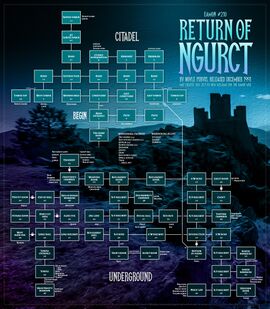
Though the cult has done some repairs and remodeling since your last visit, the basic arrangement of the citadel and its environs has changed very little since Temple of Ngurct and most of the rooms and connections are similar. As in the original, there is an above-ground portion consisting of the citadel, towers, and guard chambers, and a below-ground portion accessible from the east tower.
Note that many opponents like orcs, goblins, ogres, and robed figures will appear at random locations throughout the adventure. Most carry little more than a weapon, but one — Trok the troll — will drop a key when defeated. Friends and allies mostly wait for you in fixed locations; a few, like Joubert and Laurie, wander.
Surface

- Before entering the citadel's gates, take the east path to find Sir Charles, who arrived early and has been waiting for you. The path used to lead to a breach in the citadel wall, but the wall has been repaired and the breach closed, so return to the main entrance.
- Go north and find yourself in the citadel's wide courtyard, which extends both east (to an empty area) and west (to some trees).
- Go west into the wooded area which is inhabited by a Minotaur armed with a spear. Defeat him and exit north.
- You've reached a four-way intersection where an east-west road meets a path heading north.
- Take the western path first.
- Go west again to reach the end of the road, then south to enter the west tower where you'll find your next companion, Abdul. (Upstairs you can get a view of the vicinity.)
- Return to the four-way intersection.
- Take the north path next.
- The path leads you to a ruined tower, likely inhabited by a ghoul and other dangerous types for you to clear out.
- Return to the four-way intersection.
- Finally, follow the road east and take the first door that leads north.
- This is the headquarters of the citadel's guards, occupied by the captain and his assistant. Dispatch them and gather the coins.
- Go east to find the armory, then east again to enter the barracks where you can collect a few coins.
- Exit south and you'll be at the east end of the east-west road.
- Go south again to enter the east tower, and look upstairs to find the mage Grimlin, Though it's not indicated in the room description, stairs lead down from the base of the tower — follow them into the tunnels.
Underground
- At the bottom of the stairs, exit north to find corridors heading east, west, and north. The large oak door will close and lock behind you and you'll need an iron key to reopen it.
- Take the east corridor first:
- Follow it as it bends south, then explore the barracks rooms to the east. Defeat the orc Ragonfang and take the coins.
- Return to the corridor and follow it to the end where doors lead east and west. East is a uniform room where a thief named Tango waits; west is a magic lab where you can defeat a feisty wizard and obtain an amulet.
- Return to the intersection.
- Next follow the north corridor. The first section has rooms to the east and west.
- East is a torture chamber: kill the torturer and befriend his unwilling dwarf assistant.
- West is a kitchen with a possibly-friendly cook and a quantity of ale.
- Farther north the corridor turns west with a door east (a guestroom where you'll find the friendly and well-dressed Geladin).
- West the corridor leads first to an outer guard room, then an inner guard room, an empty weapons room, and finally "the chieftain's room".
- Return to the inner guard room and exit south into a north/south corridor.
- The room east is the mummy chamber where your friend Galin awaits. The writing on the wall has changed since last time; it now reads, "Alkanda lives."
- Go south into the next section of corridor with rooms east and west.
- East is a dining hall (which connects to the kitchen).
- West is a cave occupied by half a dozen orc.
- South again and the corridor bends east, with exits south and west.
- South is Trok's room where you'll find a set of keys, plus a secret room with a slave girl and a scarab.
- Go west and you'll enter the Red Guards hall.
- Follow it west until you reach a large north/south hallway with exits in all directions. First explore north.
- The first section of hall has doors east and west.
- East (though a door you can unlock if you picked up the keys) is a cell occupied by the prisoner Zinda.
- West is just an empty storage room.
- The second section, where the hall terminates, also has doors east and west.
- East is the Hall of Undead Warriors where you'll fight six skeletons.
- West is the priests' room. Kill the priest and take his key.
- Return to the intersection and use the priest's key to open the west cell door and free Kendal.
- Go south to reach the temple entrance.
- Entering the temple you find a high priest — and see that it's Osborne, the man the king mistakenly entrusted to dispose of the broken medallion after the last mission. With him are the resurrected mummy Alkanda and the demon Ngurct himself. Engage them all in battle. Ngurct is thankfully weaker than he was the last time you encountered him, so as long as you have a good contingent of allies you should be able to dispatch your foes, emerge victorious, and reclaim the troublesome medallion.
- A hidden exit leads south from the temple into the high priest's bedroom where you'll find the iron key needed to unlock the heavy oak door.
- Retrace your steps to the locked stairway door,
OPENit with the iron key, and ascend to the surface.
Go back to the main entrance and depart south to the Main Hall.
Reviews
Reviewer Tom Zuchowski describes Return of Ngurct as "solidly crafted with a good map and few errors" and says it's likely to please players who enjoy "hack'n'slash"-style adventures. He describes some of the combat as very intense, but notes that the large number of companions, monsters, and artifacts can make for lengthy lists that get tiresome to wade through. Zuchowski gave the adventure a difficulty rating of seven.
Trivia
- Jim Plamondon, co-author of the original Temple of Ngurct, was unaware of Purvis's sequel and first learned about it in correspondence with Huw Williams in 2019.
External links
- EAG Online: Master List
- The Interactive Fiction Database: Return of Ngurct
- Interactive Fiction Reviews: Return of Ngurct
| |||||