The Zyphur Riverventure
| The Zyphur Riverventure | |
|---|---|
| ◄Eamon adventure #4► | |
 | |
| Author | Jim Jacobson |
| Released | 1980 |
| EAG number | 4 |
| EDX number | 03-02 |
| EDX set | The Jim Jacobson Adventures Deluxe |
| Native format | Apple DOS 3.3 |
| File | Eamon 4 - The Zyphur Riverventure.dsk |
The Zyphur Riverventure is an Eamon adventure written by Jim Jacobson.
Background
The Zyphur Riverventure is Jim Jacobson's second adventure, following The Cave of the Mind. Unlike the previous adventure, it is credited to Jim Jacobson alone, and not to Red Varnum. It is notable for being the first Eamon adventure to feature extensive exploration of wilderness environments rather than being set entirely within underground caves, although about a third of the adventure still takes place underground.
Premise
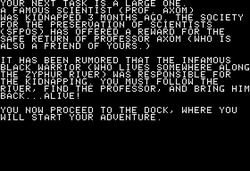
The adventure's introduction establishes the mission:
Your next task is a large one. A famous scientist (Prof. Axom) was kidnapped three months ago. The Society for the Preservation of Scientists (SFPOS) has offered a reward for the safe return of Professor Axom (who is also a friend of yours). It has been rumored that the infamous Black Warrior (who lives somewhere along the Zyphur River) was responsible for the kidnapping. You must follow the river, find the professor, and bring him back... alive! You now proceed to the dock, where you will start your adventure.
Walkthrough
Before embarking on this adventure, ensure that you have at least 500 gold pieces in hand. You begin at a dock on the Zyphur River, with the Main Hall to the west and the river to the east.

- An old man asks if you want to buy his boat. His asking price is between 200 and 500 gold pieces, chosen randomly. If you cannot pay, you must return to the Main Hall, so whatever the price, buy it. (There is a random chance that the boat will immediately sink as soon as you buy it, in which case the old man will offer to sell you another.)
- Enter the boat. Doing this first before going onto the river is important, since leaving the dock without entering the boat will result in you swimming — something the adventure lets you do for only a limited number of moves before drowning.
- Go east onto the river. The strong currents will force you south, then east around a bend where you'll find clearings on both banks.
- Visit the north clearing first and get the brass lantern.
- Re-enter the boat and go back across the river to the south clearing.
- Take the trail south to the first intersection with a rough path. This path snakes its way north and west through the forest and is the way you'll go to get back to the Main Hall after you've found the professor. Though you'll be traversing it later, you may want to go ahead and explore it now since you'll encounter a hobo who may become your ally. The hobo is in the small house along the path, along with a leather bag containing a valuable necklace.
- Going further south on the main trail takes you along a cliff and past several exits to the east and west:
- The first chamber to the west is empty.
- The second chamber to the west is occupied by a dragon. There's no treasure to be had, so either avoid it or fight it for experience.
- The first chamber to the east is the entrance to a tunnel, and is guarded by a vicious three-headed dog.
- The second exit to the east is an empty cliff-top clearing from which you can see a distant waterfall.
- Following the trail south and east to its end, you'll find another river landing. This is a dead-end: if you swim out into the river you will be swept south and over the waterfall to your death.
- Take the entrance that was guarded by the three-headed dog and follow the rough stony tunnel east, picking up a silver lantern along the way.
- You'll find a side-passage going south; follow it to two side chambers, both barracks:
- The east barracks is empty.
- The west barracks is occupied by the Gold Warrior who may join you as an ally.
- Continuing along the east/west tunnel you pass another side-passage going north. Skip this for now and continue east.
- You've reached a cell block at the end of the tunnel with small cells to the north and south:
- The north cell is empty.
- The south cell is occupied by "Prisoner #13" who may join your group.
- Exit the cell block and take the tunnel north to a large marble cavern.
- Take the east corridor and enter the weapons room, which has a closet containing a chain you can use as a weapon, and a loft where you can encounter and defeat a small creature named "Mxlar".
- Return to the large cavern and continue north.
- You will reach a landing next to a large underground pool, with another landing on the far side and a river tunnel going west. Swim north into the pool and out onto the other landing. (You can also swim west along the tunnel and fight the water-creature Cetus, but there is no treasure or weapon drops so ignore if you wish.)
- Follow the tunnel north and east until you come to the end of a north/south corridor.
- Visit the room to the south and collect the uniforms.
- Take the corridor north to a T-intersection.
- Take the long east tunnel, encountering a dog along the way.

"From here you can see for miles and miles over a range of fields and mountains." (Acadia National Forest) - You will reach another T-intersection, this one containing a face-shaped stone and an oaken chest. (The exits north and south lead only to empty look-out posts.)
- Open the chest to find a cache of ancient gold coins.
- The stone is too heavy to lift, and if you attempt to "take jewel" from its mouth, it will transform into a rock monster. Attacking the monster will break your weapon, but casting blast will cause it to crumble into dust.
- Retrace your steps back toward the large marble cavern. Just before reaching it, examine the corridor described as having "strange rectangular shapes" in the walls and you'll find a hidden corridor going east.
- In the secret corridor you will encounter the Black Warrior himself! Defeat him and continue east.
- In the middle of the corridor is a door that leads north to a small storage room; enter it and take the bowl of healing "shemlock".
- At the end of the corridor is a door that opens south into a ruined laboratory where you will at last find Professor Axom. (The two adjacent storage rooms are empty.) Collect the three potions, which you may drink for the following temporary effects:
- The blue potion increases hardiness.
- The red potion increases agility.
- The clear potion increases charisma.
- With the professor in tow, retrace your steps all the way back along the tunnels and corridors, out to the clifftop, along the path, west through the forest, north to the clearing, and finally back to the Main Hall.
Upon the safe return of Professor Axom you will receive a randomly-determined reward of between 100 and 600 gold pieces.
Reviews
Tom Zuchowski gave the adventure a rating of 5, and praised its content (particularly for an early Eamon) such as the unique boat travel, though he disliked the necessity to have to reenter the boat each time to avoid drowning. He stated that while it's content may feel low in comparison to more advanced Eamon adventures, it was still a relaxing play.
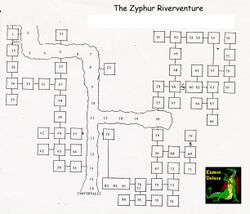
Luke Hewitt very much enjoyed the Eamon Deluxe version, particularly the unique map, the sense of objective and the appearance of the Black Warrior himself. Though he disliked some of the encounters with wildlife that he felt served less purpose, he still awarded the adventure a score of 7-10.
Location
Jacobson describes the Zyphur River as being within walking distance south and east of the Main Hall, flowing generally southeast through forested hills and cliffs and over a tall waterfall. The river in Donald Brown's earlier Lair of the Minotaur is probably also the Zyphur, though it's not named in the adventure.
In other adventures
- The shrine to the wizard Trezore seen in this adventure marks the first appearance of the wizard whose help is sought in Jim Jacobson's later adventure.
- The mechanics used for riding the boat on the Zyphur River with one-way passages denoting flows of current, and no mention of the boat in room descriptions, started something of a tradition in Eamon adventures that many authors would revisit, such as Jim Jacobson in The Quest for Trezore. It is also gently parodied by Thomas Ferguson in A Runcible Cargo along with other Eamon standbys.
- In the Eamon Deluxe version of the adventure, various characters such as Prisoner 13 and The Gold Warrior will appear in further adventures in The Jim Jacobson Adventures Deluxe if they left with you as friends. You also get to face the Black Warrior again in Hades during The Devil's Tomb.
- The Eamon Deluxe conversion of Quest for Trezore also sees the return of the EDX-only character Dr. Benway, as well as the appearance of the mysterious adventurer Edgar.
Trivia

- The command "drink" was added as a special to the original version of the adventure, but would become a staple of the Eamon system in later versions of the Main Program.
- In an early draft of the Eamon Deluxe conversion, the Black Warrior was mistakenly called the Black Knight in the introduction sequence. The Eamon Deluxe version also exclusively states that the Black Warrior has captured Professor Axom (and several other scientists), in order that they build him a super-weapon to attack the guild. Accordingly, you find not just Axom but also the Professor from the American TV program Gilligan's Island, and Doctor Benway of Interzone working in the Black Warrior's lab.
- The EDX-only character Dr. Benway is also a principle character of both William S. Burroughs' surrealist novel Naked Lunch and of Frank Black's own Adventure in Interzone.
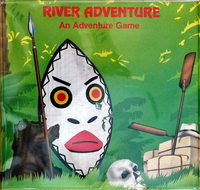
- A version of Zyphur Riverventure entitled River Adventure was released by Load'N'Go! Software for its commercial Adventure Series.
External links
- EAG Online: Master List
- Eamon Adventure Browser: The Zyphur Riverventure
- The Interactive Fiction Database: The Zyphur Riverventure
- Interactive Fiction Reviews: The Zyphur Riverventure
| ||||||||