The Treachery of Zorag
| The Treachery of Zorag | |
|---|---|
| ◄Eamon adventure #274► | |
 | |
| Author | Derek Jeter |
| Created | 2012 |
| Released | May 2013 |
| EDX number | 25 |
| Native format | PC DOS |
| File | Eamon 274 - The Treachery of Zorag.zip |
The Treachery of Zorag is an Eamon adventure written by Derek Jeter for use with the Eamon Deluxe system, notable for its expansive map, its many custom effects, and its system for handling thirst, hunger, and fatigue. In August 2020 the adventure was ported to Eamon Remastered.
Background
Eamon Deluxe creator Frank Black announced in an April 2013 post to the EAG Online Blog that he was testing and debugging The Treachery of Zorag and predicted it would be ready for release by May, but development of the system ended around that time and the adventure was never included in an official release.
Jeter later published the adventure himself on his own website, using a Javascript-based version of DOSBox to make it playable through a web browser.
Premise
A knight from the nearby city of Behlos arrives at the Main Hall to announce that the king is assembling a party of the land's greatest heroes to investigate the possible return of Zorag, an evil wizard imprisoned for many years and now feared to be free. The knight asks for the Guild's greatest warrior to join the party, and when your comrades all point to you, you accept the errand. The knight orders you to appear at the King's Hall in Behlos at sunrise on the second day to begin the mission.
| Full introduction |
|---|
|
While milling about the Hall of the Guild of Free Adventurers, you hear a loud rapping sound that draws everyone's attention to a Knight from the nearby city of Behlos. He clears his throat and begins to speak, "I will not waste your time. We have all seen the rise of a 2nd moon, blood red, that foretells the rise of an ancient power. You know of what I speak." He pauses for a moment, the room silent as a tomb, and continues. "Zorag" There is a collective gasp in the Hall. You have heard the legends of a powerful wizard who continuously sought greater power by unnatural means and was eventually imprisoned by a benevolent order of Druids. Unfortunately, the order faded over time and the magic that held Zorag in captivity waned. Rumors circulated for years that he was free and was drawing all power and evil to him, but many dismissed this as mere speculation. Some didn't even believe he really existed. Most believed he had died while being held by the Druids. The Knight continues, "King Raulos is assembling a party of this land's greatest heroes to investigate the possibility of Zorag's return and defeat him if he has indeed returned. One of you must join this quest. Who is this Guild's greatest warrior?" Without hesitation, everyone turns and points to you! Some yell out, "Sam!" with excitement and others say it with relief that they will not be burdened with this errand. You step forward to the Knight and announce yourself. The Knight looks at you with doubt, and perhaps even a bit of fear. Finally, he says, "You have one day to gather your equipment and say goodbye to loved ones. You are to take the King's Road to Behlos and meet at the King's Hall at sunrise on the second day. To fail to appear or to be late will be considered treason to the realm, punishable by death. That is all." With that, he briskly walks away. |
Walkthrough

The journey from your starting point to Behlos City and parts beyond is long and tiring so keeping supplies on hand is vital; the care package at the very beginning contains some food and water to get you started. When you get fatigued you can make camp for the night, but vicious gnolls or goblins may randomly appear while you sleep to attack you. If you camp with friends, each will take a watch for part of the night.
On the first leg of your journey, be sure to head straight to Behlos City — if you stray too far off course into the countryside, the king's men will pick you up and execute you for failing to follow your orders.
The following walkthrough was written by Derek Jeter in March 2013:
- Proceed to Great Hall (75) where King Raulos will bestow quest.
- Buy coat for mountain pass (or will freeze to death) and boots at Kingsworth Clothing (81).
WEAR COATandWEAR BOOTS. - Buy lantern, buy water, rations and rope at Burly Irishman’s Outfitters (74).
TALK BARKEEP ABOUT DRUIDat Black Horse Tavern (77). He will reveal that a Druid named Tealand comes in occasionally to visit.- Talk to Boris in Trollsfire Pub (76). He will try to persuade adventurers to join him in an expedition to a cave at Gull’s Eye Cliffs (48) by telling of great treasures.
SAY YES TO BORISto join his quest. Only he can open the secret door in the cave (48). - Proceed to cave (48), Boris will lead the way.
- At the cave, defeat Chimera and get Wand of Warding. Boris will take his share of treasure and peacefully exit the adventure.
- Proceed to dead forest.
- Evil Tree Spirit (30) will not allow you to pass. It can only be slain by magic Wand of Warding (
USE WAND). - Proceed to clearing (32).
SAY TEALANDin order to summon Tealand the Druid. - Proceed to the entrance to mountain peak (43).
- Tealand will open the doors to Fellspawn Caverns.
- Proceed to cavern (93) and defeat Giant Spider.
EXAMINE GIANT SPIDER.TAKE RED KEY. - Proceed to cavern (123) and
OPEN COFFIN. Defeat vampire.EXAMINE VAMPIRE.GET COMPASS. - Proceed to cavern (137) and
OPEN PORTCULLIS. - Proceed to cavern (141).
USE ROPE. - Proceed to cavern (142). Witch Seer will give player key to door in Room 145.
- Go to cavern (145).
OPEN DOOR. - Go to cavern (150). Defeat Gargoyle.
EXAMINE DAIS.OPEN COMPARTMENT.REMOVE CAULDRON FROM COMPARTMENT. - Return to cavern (142).
GIVE CAULDRON TO WITCH. The witch has a lot to say,TALKto her about stuff. - Exit caverns and proceed to the Foulwater Marshes (37). Be sure you have the Compass of Truth before entering.
- Proceed to Room 353 (Exterior of Grimhold's Tower).
EXAMINE GRATING - Proceed west into the wall's tunnel. Go north into the culvert.
- Go to Tower Chamber (231) on Level 1.
EXAMINE ART.OPEN VASE.REMOVE SCROLL FROM VASE.READ SCROLL.GIVE SCROLL TO SANDEER. - Proceed to Chamber (270) on Level 2.
- Sandeer will unlock magical portcullis in Chamber (270).
- Go South into Chamber (281).
EXAMINE PRISONER.OPEN LEATHER POUCH.REMOVE STONE FROM POUCH. - Proceed to Chamber (341) on Level 4.
EXAMINE TAPESTRY.OPEN SECRET DOOR. Go south through secret door.- Proceed to Chamber (343). Defeat Spectral Guardian (it won't let you free Zorag).
- Use Power Spell to activate Stone of Unbinding.
FREE BOUND HUMAN. - Return to Great Hall (75). All hell breaks loose.
- Return to Starting Room (1) to exit adventure.
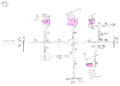
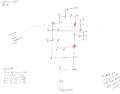
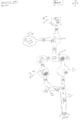
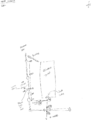
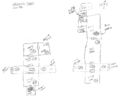
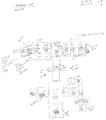
Author's maps
The following hand-drawn maps were created by the author:
-
 Behlos City
 -
 Fellspawn Caverns
 -
 Foulwater Marshes
 -
 Tower dungeon
 -
 Tower exterior
 -
 Tower level 1
 -
 Tower level 2
 -
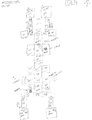 Tower level 3
 -
 Tower level 4
 -
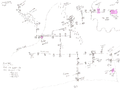 The wilderness


Locations

The adventure centers around four main areas — Behlos City, Fellspawn Caverns, Foulwater Marshes, and Grimhold's Tower — all connected by roads and paths running through the expansive wilderness. Play begins at the western end of the King's Road with a path leading south to the Main Hall, suggesting that Behlos City lies to the east/northeast of Evenhold — "miles and miles," according to Jeter's descriptions of the journey.
The sea is beyond it to the east and south, the Shadow Mountains to the northwest, and the Dead Forest to the north. Foulwater Marshes, and Grimhold's Tower beyond it, lies a number of miles both northwest of Behlos and north of the Main Hall.
Trivia
- At 304 rooms, 86 artifacts, 40 monsters, and 135 effects, this is one of the largest single adventures in the Eamon series.
- A lute player in the Black Horse Tavern in Behlos City sings a song about a harlot from Zagora named Tamsin. Zagora is the name of the evil alternate world in the 1987 adventure Rhadshur Warrior by Roger Pender, and Tamsin one of the adventure's characters.
- The Trollsfire Pub in Behlos is named for the Trollsfire sword.
- The "Moleman's Jerky" included in the care package is named for the villain created by John Nelson.
External links
- EAG Online: Master List
- Eamon Adventure Browser: The Treachery of Zorag
- The Interactive Fiction Database: The Treachery of Zorag
- Interactive Fiction Reviews: The Treachery of Zorag
- The Treachery of Zorag, playable online version
- Play online (via Eamon Remastered)
| ||||||||