The King's Testing Ground
| The King's Testing Ground | |
|---|---|
| SwordThrust adventure #1► | |
 | |
| Author | Donald Brown |
| Released | 1981 |
| EAG number | SW1 |
| EDX number | 02-10 |
| EDX set | The Donald Brown Adventures |
| Native format | Apple DOS 3.3 |
The King's Testing Ground is a SwordThrust adventure written by Donald Brown in 1981 and is the first in the SwordThrust series.
Premise
Like The Beginners Cave in Brown's original Eamon series, The King's Testing Ground is a relatively simple expedition created as a means for beginners to gain some money and experience. The introduction elaborates:
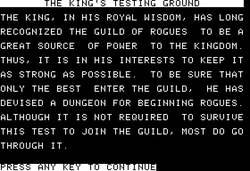
The King, in his royal wisdom, has long recognized the Guild of Rogues to be a great source of power to the kingdom. Thus it is in his interests to keep it as strong as possible. To be sure that only the best enter the guild, he has devised a dungeon for beginning rogues. Although it is not required to survive this test to join the guild, most do go through it.
This dungeon has relatively easy money in it, a good way for a novice to build a stake for him/herself.
You go to the warlock in charge of the dungeon. After you sign a form freeing the kingdom from responsibility for your death or other accident, he waves a hand at you, and your vision blurs. When your eyes focus again, you find yourself in a small chamber, alone!
Walkthrough
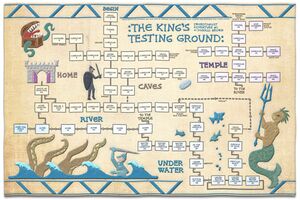
You begin your adventure in an empty underground chamber at the north end of the Testing Ground, which consists of a set of tunnels, caverns, and underwater passageways on the north edge of a swiftly-flowing river, plus a temple that stands on the riverbank. This walkthrough doesn't provide the quickest path to the end, but instead lets you reach every encounter and every artifact without unnecessary backtracking.

Caverns
- Exit south from the starting chamber, follow the tunnel, and kill the spider. It carries nothing, but it's good practice to always
examinethe bodies of fallen monsters to see if they're carrying any weapons or treasure you can loot. - Arrive at a four-way intersection.
- First take the east branch: it leads to a small chamber where you'll find long-lost knight Richard who'll likely decide to accompany you. Collect the healing potion and the food, then return to the intersection.
- Next take the west branch, which after a couple of turns ends in a chamber occupied by what at first glance appears to be a chest but is in fact a hostile mimic. Return to the intersection.
- Step south and examine the corridor to reveal a hidden door in the east wall that opens onto a secret corridor.
- Follow the secret corridor east, battle the wolf, and arrive in a small chamber where you'll find a pill marked "H₂O→O₂". (Swallowing it will allow you to breathe underwater when the time comes.)
- Return all the way back west to the main north/south corridor, then go south to do battle with a knight in black armor. The knight is a capable adversary, so if you wish to play it safe you can avoid the encounter by instead following the secret corridor south and bypassing the knight.
- You'll now be in the middle of a long east/west corridor. At the west end is a hole you can climb up through to reach the surface and return to the Main Hall, but for now let's explore east.
- At its east end the corridor opens onto the shores of a small subterranean lake. The plant growing here may be hostile, but if you're sufficiently strong it will just ignore you. Open the box and collect the crown inside.
Underwater
- Go east into the lake. If you haven't already,
swallow pill. - Swim down three times and you'll encounter an aggressive triton. To get past him, either defeat him in battle (and take his trident) or flee until you reach the very bottom of the lake.
- Follow the underwater tunnel east. Note that the tunnel loops in on itself so once you've entered you can't swim back! Go east once more and you'll be below a vertical shaft.
- Swim up the shaft and fight the eel.
- Keep going up until you emerge into a small chamber without exits. Get the magic rod and examine it to find an inscription that reads, "Emoh".
Saythe word and the rod will magically transport you back to the shores of the lake. - Enter the lake again, then swim down twice.
- Follow the water-filled tunnel all the way to it's west end and swim up to reach the surface of the river.
Temple

- Climb up into the grotto and you'll be at the entrance to a grand temple. The east and west corridors lead only to empty rooms so follow the north corridor.
- You'll arrive at a second four-way intersection.
- First take the east corridor which leads to a room where you can fight a pack of rats. Return to the intersection.
- Next take the west corridor and you'll discover a room containing a sword embedded in a large stone. You aren't strong enough to pull it free, but if you
wearthe crown you found earlier and try again it will come free easily and you'll have the mighty 2d8 sword Excalibur. Return to the intersection. - Take the corridor north until you reach a chapel dominated by a grotesque, leering idol. Kill the worshipper, take the spices, and steal the idol's jeweled eyes.
- Check the east side chamber and you'll find a hostile priest, plus a golden statue of a mermaid and a magical book. (Don't read the book: it will turn you into a fish!)
- Return to the temple entrance and climb down to the surface of the river.
River and exit
- Take the river west three times.
- Battle the enormous octopus.
- Go west once more and you'll hear the sound of a waterfall to the west. Following the river any farther will send you over the falls to your death, so climb up onto the landing to the north.
- Go north and you'll be near the Main Hall, and north once more will end the adventure.
For a different walkthrough of the adventure, see the SwordThrust Walkthrough by Chester Bolingbroke.
Trivia
- Excalibur is the legendary sword of King Arthur who pulled the sword from a stone.
- The adventure bears some similarities to Brown's earlier Eamon adventure The Beginners Cave, including a priest in a temple, a mimic, a room full of rats, and a magical book that can turn the reader into a fish.
Gallery
-
The adventure's cover
-
Title text
External links
- Eamon Adventurer's Guild Online
- SwordThrust – Guide and Walkthrough by The CRPG Addict
- Internet Archive: SwordThrust
- MOCAGH: SwordThrust
| ||||||||
| ||||||||
