The Lost Isle
| The Lost Isle | |
|---|---|
| ◄Eamon adventure #200► | |
 | |
| Author | Robert Davis |
| Released | June 1990 |
| Revised | 29 April 1990 |
| EAG number | 200 |
| EDX number | 16-15 |
| EDX set | Classic Eamon Adventures, Vol. 4 |
| Native format | Apple DOS 3.3 |
| File | Eamon 200 - The Lost Isle.dsk |
The Lost Isle is an Eamon adventure written by Robert Davis and released in June 1990. The adventure is an adaptation of the AD&D module The Lost Island of Castanamir, written by Ken Rolston and published in 1984 by TSR.
Background
The Lost Isle and Quest of the Crystal Wand are the two Eamon adventures written by Robert Davis (not to be confused with Bob Davis). Although written by Davis, the main program indicates that The Lost Isle was "converted to DOS 3.3" by David Cheever on December 18, 1989. There is no ProDOS version of Isle; this suggests that the adventure may have originated as a non-Eamon text adventure.
Premise
The Lost Isle begins with the adventurer overhearing a pair of wizards debating the existence of an island off the shore of a local sea. They suggest that this island was the home of the wizard Castanamir, who disappeared along with his island—and treasure—two hundred years prior to the setting of the adventure. The wizards, satisfied that the island exists, set off to loot it; naturally, the adventurer recruits a pair of mercenaries—a dwarf and an elf—to accompany him or her, plotting to beat the pair of wizards to the island.
| Full introduction |
|---|
|
You are sitting in the local tavern. As you are there, you overhear a very strange conversation between a couple of magic-users in the corner. Mage: "I tell you that I saw it! I'm positive! The island just seemed to appear out of nowhere!" Wizard: "And I tell you that you were drunk. Everyone knows that Castanimire and his island disappeared over 200 years ago!" Mage: "I swear it! It has to be his, all of my history books describe it as a wasteland off the sea shore to the east." Wizard: "Not so loud! If it is his island then we must go there and get his treasures before anyone else does. There's bound to be a fortune there." With that the mages leave the tavern. Since obviously these guys didn't notice that you were listening, you decide to beat them to it. You manage to get to the east road outside of town. There is no sign of the mages at all. You've arranged for some help down the road as you've no intention of going to the island alone. Your contacts will be a dwarven fighter and an elvin mage. Good luck... |
Walkthrough

Castanamir's island home is easy to reach by taking the road east to the shore, then sailing the small boat east to the isle with your companions. However, most of the wizard's underground chambers are linked by one-way magical portals that connect in unintuitive ways that make navigation difficult; for example, if you enter a room by going south, returning north may not take you back to the original room.
Since the mission established in the introduction is to loot the wizard's treasures, this walkthrough will allow you to collect all the most significant or valuable artifacts in Castanamir's home but does not take you through every room or encounter. If you wish to see everything, use the map to find your way around.
Once on the island, begin by descending the stairs and collecting the torch.
Living areas
The first level of Castanamir's home consists mostly of living quarters, starting with a green living room. You can progress through the first few rooms in order by exiting north from one to the next, but the exits in other directions (including back south) are not intuitive.
- From the stairs, first go south in to the living room and fight the two thieves Doblin and Joblo.
- Go north into the lounge and fight the three hobgoblins and their captain.
- Go north into the dining room and kill the three rats.
- Go north into the kitchen, kill the two berserkers, and collect the blue potion. Drinking it will restore some lost hitpoints.
- Go north into the fencing room and kill the feral slasher.
- Go north into the empty fantasy room.
- Go north into the circular room and defeat the Gingwatzim waiting there. The sign says that you can reach the laboratories and workrooms by climbing "the ladder which does not exist"; this unseen ladder is in the room with you, but before going up there are other living areas to explore.
- Go north into an east/west passage with guest rooms north and south.
- In the north guest room you'll find a case containing a scroll which you can read to restore some health, plus a lizard man waiting in the side chamber.
- The south guest room is empty, but if you examine the east side chamber you'll uncover a valuable bag of pearls.
- Follow the passage east, then turn north.
- You'll now be in another east/west passage with servants' quarters to the north and south.
- The north quarters are empty, save for a piece of paper in the east side chamber that appears to be a letter to Castanamir from one of his simple-minded servants.
- The door to the south is boobytrapped with crossbow bolts, and the chambers beyond are darkened and entirely empty.
- Take the passage east, then east again and you'll be back in the kitchen.
- Retrace your steps north through the fencing room and fantasy room to reach the circular room.
- Climb up and you'll be in an east/west hallway with a door south.
- The south room is Castanamir's elegant bed chamber, now inhabited by an aggressive flesh golem. Dispatch the golem and examine the room to discover several treasures: a bag of gems, a leather bag holding 200 gold coins, and Castanamir's spellbook.
- Return to the hallway and exit east.
Laboratories and workrooms
You're now in a short hallway with exits in all directions.
- Go north and you'll enter the Enchantment Lab; examine the room to find another scroll case.
- Go west into the library and fight the mage lurking there.
- Go south and you'll be on the main floor of Castanamir's tower. Climb down to the bottom to get a jeweled sword, and up to the top where you can fight a hippogriff and collect a golden egg. Return to the main floor.
- Go north into the trophy room; kill Arriflex and take the valuable trophy.
- At this point you've gathered everything that's worth taking, so it's time to make your way out. Go west to return to the short hallway, then south to the hallway outside Castanamir's bedroom.
- Reenter the wizard's bedroom and take the east exit: it leads directly back to the stairway near the entrance.
- Climb the stairs, sail the boat west back to shore, and follow the road west to the Main Hall to complete the adventure.
Review
In his review of The Lost Isle, Andy Brobston awards the adventure a score of 4/10, describing the adventure as a straightforward "kill'n'loot" campaign. While pointing out that the addition of strong companion monsters eases the difficulty of the combat, Brobston remarks that due to "off the wall" room connections, the attention required for mapping the adventure while playing increases the difficulty somewhat.
Location
Castanamir's Island is a relatively short distance off the western shore of a nearby sea, one that can be reached from Evenhold by taking the East Road.
Gallery
-
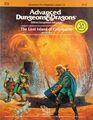 The cover of the D&D module The Lost Island of Castanamir
 -
 Sketch of Castanamir's island by Huw Williams

External links
- EAG Online: Master List
- The Interactive Fiction Database: The Lost Isle
- Interactive Fiction Reviews: The Lost Isle
- Wikipedia: The Lost Island of Castanamir