Thror's Ring
| Thror's Ring | |
|---|---|
| ◄Eamon adventure #114► | |
 | |
| Author | Tom Zuchowski |
| Released | October 1985 |
| Revised |
5 March 1990 (DOS) 21 May 1991 (ProDOS) |
| EAG number | 114 |
| EDX number | 05-01 |
| EDX set | The Thomas Zuchowski Adventures |
| Native format | Apple DOS 3.3 |
| Files |
Eamon 114 - Thror's Ring.dsk Eamon 114 - Thror's Ring (ProDOS).dsk |
Thror's Ring is an Eamon adventure written by Tom Zuchowski and holder of the third-highest-rating of all the adventures reviewed by Eamon Adventurer's Guild. The adventure is set in Middle-earth and introduces several characters who reappear in Zuchowski's subsequent Tolkien-inspired adventure, Assault on Dolni Keep.
Premise
Two emissaries from Middle-earth, a wizard and an elf, approach you at the Main Hall and ask if you would be interested in joining a dangerous but also very worthy and profitable quest. Indicating your willingness, the wizard explains the particulars:
A Ring of Power once worn by the Dwarf king Thror was lost centuries ago when the Dwarvish stronghold of Khazad-Dum (also known as Moria) fell to invading Orcs. The wizard says he has reason to believe the ring still lies somewhere in Moria, and recovering it is the goal of the expedition.
The wizard magically transports you to the woodland realm of Lothlorien where the Elven lady Galadriel greets you and introduces you to your companions: the Dwarf Gorim, nephew of Thror and a berserker in combat, and the Wood-Elf Galahir, an expert bowman. To aid your quest, she also gives you a bottle of a magical healing substance called miruvor and enhances your Power spell to reliably produce positive results the first five times it's invoked. Accepting her blessing, you and your companions leave Lothlorien and head north toward the entrance to Moria.
| Full introduction |
|---|
|
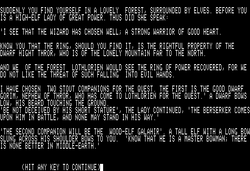
One fine day, while lounging about the Main Hall, you noticed two newcomers who were exceptional, even compared to the extraordinary types who hung about with the Irishman. One was uncommonly fair to look upon, a High-Elf by the look of him. But the other— a small, nondescript man in dingy robes, but with eyes to pierce steel; the look of one not to be trifled with. Looking about the hall, he spied you. "This one," he said. They approached. "Good sir," he said to you, "I have a proposition in which you might have interest. The good elf and I represent sponsors of a forthcoming expedition into the abandoned mines of Moria. There will be a worthy quest, fabulous loot, and incredible danger. Dost thou have interest in such an adventure?" (Who does he think he's talking to?!!) You nod, and try to look nonchalant. "This is good!" he said, "for you are my choice among the many worthies of this hall. "First, we must ascertain if you have hidden qualities that would aid you in the quest. "We must determine: dost thou have the wider vision that some call '80-column capability'?" [Yes] "This is good, for the use of such will enhance, I think, your ability to see all that is around you. "Wouldst thou use this wider vision? I must warn you, if thou hast lied about its possession, and it be invoked, thou will indeed go blind, and nought but the invocation of a reset spell can return you to this world. "Wouldst thou use the wider vision?" [Yes] "Good! "Now, here is the meat of the quest. As all know, the Dwarvish stronghold of Khazad-Dum, that many know as Moria, was sacked by the Orcs many hundreds of years ago. It was then that the Ring of Power that controlled Moria was lost. "We have reason to know that the ring is still there, and may be recovered by one both cunning and strong." Again, you nod. "I am that one." The wizard leans close... he whispers, "I have a final piece of advice for you— if thou find the quest too perilous, and wouldst divine the dunjon's secrets, do first peruse yon disk file hight 'Builder's Notes'. The wizard stands still and tall, and invokes— "Peiah!... Arrah!... Three!!!" Suddenly you find yourself in a lovely forest, surrounded by Elves. Before you is a High-Elf lady of great power. Thus did she speak: "I see that the wizard has chosen well; a strong warrior of good heart. "Know you that the ring, should you find it, is the rightful property of the Dwarf hight Thror, who is of the Lonely Mountain far to the north. "And we of the forest Lothlorien would see the Ring of Power recovered, for we do not like the threat of such falling into evil hands. "I have chosen two stout companions for the quest. The first is the good Dwarf Gorim, nephew of Thror, who has come to Lothlorien for the quest." A Dwarf bows low, his beard touching the ground. "Be not deceived by his short stature," the lady continued, "the berserker comes upon him in battle, and none may stand in his way. "The second companion will be the Wood-Elf Galahir." A tall Elf with a long bow slung across his shoulder bows to you. "Know that he is a master bowman; there is none better in Middle-earth. "I have parting gifts to you, that will aid you in your quest." She hands you a small crystal bottle. "This contains a magical substance called miruvor. It will heal the injuries that you take in battle. "And know that I have enhanced your own Power spell. It will not fail you for five invocations, but then it will be exhausted; use it wisely. It may be invoked by any of the three companions. It will aid you beyond hope, never harm you, and will never aid your enemies. "The quest is not a simple one; you may make many false starts. Prudent use of the 'save' command will abate the many tedious journeys from the Main Hall, for it is revealed that the resumption of a saved game will not delete the 'save' files from the 'save' disk! Go now, and have my blessing." |
Walkthrough
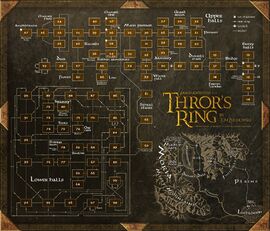
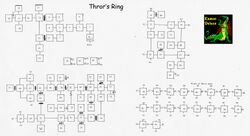
EAG president Tom Zuchowski wrote a walkthrough for Thror's Ring that was published in the December 1996 issue of the club newsletter. The walkthrough below is similar and guides you through the key encounters necessary to complete the mission and collect the most valuable treasures, but doesn't cover every room in the adventure. For help navigating areas not covered in the walkthrough, please refer to the map.

Journey to Moria
After receiving your instructions and gifts from Galadriel, you begin with your companions Gorim the Dwarf and Galehir the Wood-Elf on the northern edge of Lothlórien.
- Head north and west through the plains until you reach the foothills of the Misty Mountains.
- Go north into the glen and battle the Southrons camped there. After the battle examine their camp to find a knocked-over tent, then open it and collect the oil lamp. Return to the path.
- Continue west through the pass to reach the valley of Dimrill Dale. From here you can go either north or south around the lake. The north path leads to the locked and heavily defended main gates, so instead take the path south around the lake.
- The path will take you to a side door, guarded only by a single warg. Kill it, open the door, and enter Moria. (Note: If you're playing the Eamon Deluxe version, the side door is locked and the captain at the main gate carries the key, so you'll have to defeat him to obtain it.)
Entry halls
- Once inside Moria you'll run into a trio of Uruks; defeat them and take the torch dropped by their leader. Though lit, the torch has nearly burned out, so light the oil lamp you picked up earlier.
- Go north into the vast entry hall.
- Cross west over the Bridge of Khazad-dum.
- Continue west to the Dimrill Stair and climb up.
Upper halls
- You're at the east end of a long main passage. The exits lining the hall are mostly dead-ends occupied by monsters, so for now go west four times.
- Examine the cracks in the uneven wall to reveal a secret passage leading south.
- Take the passage to an armory with more cracks in the west wall; examine them to uncover yet another secret exit leading to the "twice-hidden armory". In the first section you'll find a shirt made of steel mail; in the second is a shirt of mithril mail, and if you examine the bones littering the chamber you'll also spot the skeletal remains of a dwarven armorer who still has a ring of keys on his belt. Take the key ring and return to the main passage.
- Go east twice (back along the main passage) and take the south exit which leads to another old armory. There you'll find a locked chest which you can open with the armorer's keys, and inside a magical sword named Yrchost. Like Frodo's famous Sting, the sword will glow when enemies are nearby. Get the sword and return to the main passage.
- Go west until you reach the enormous First Chamber. Go to the north end of the chamber and examine the floor to find a small hole; it looks like a keyhole but you don't yet have the right key for it. Return to the center of the chamber.
- Continue west four times along the main passage to reach the Second Chamber. The sound of many orcs comes from ahead; ensure you and your party are in good shape and then go west once more.
- You've emerged into an amphitheater filled with hundreds of orcs — and on the floor is a key-like hook that will fit the hole you found earlier. Quickly grab the hook, weather the first wave of attacks, then cast the Power spell (which Galadriel guaranteed would do no harm). You'll be transported away from the orcs to another part of Moria. If you or your party were injured, remember to drink some of your miruvor and share it with your companions.
- Make your way back to the north end of Chamber One and put the hook in the hole in the floor. A secret trap-door will open, revealing a set of spiral stairs leading down.
Lower halls
While the central rooms of the lower halls connect logically, they're surrounded by a maze of 18 identically-named rooms that interconnect in unintuitive ways and that are easy to get lost in even with a map. Stick carefully to the directions and avoid wandering.
- Descend the spiral stairs, fighting the three spiders along the way, until you reach the very bottom.
- Take the tunnel north, then east, then north again to reach a four-way intersection.
- (If you're playing the Eamon Deluxe version of the adventure, take a very short foray into the surrounding maze: go east twice and there find a valuable "Ever-Lite torch" that will never burn out. Return to the four-way intersection by going west twice.)
- Go north twice to another intersection, then west twice to another.
- Go north and you'll be outside a charred room suffused in smoke and dim red light; Gorim and Galehir predict it contains a dragon, and share their advice on how to defeat it. Ready your sword Yrchost and step east into the room.
- You're in Moria's treasury, now dominated by the mighty dragon Mograf. Attack the dragon with the magical Yrchost, now glowing brightly, and he'll rear up to avoid its painful bite, at which point Galehir will fire an arrow into Mograf's exposed belly, gravely wounding him. You may need to repeat the process once more, but if Mograf strikes you down first your companions will cast a Power spell to restore you. Once Mograf is defeated, carefully examine his hoard: you'll find an emerald, a diamond, and the object of your quest: Thror's Ring!
- Go west to leave the treasury, step south into the intersection, and then east once to where a doorway leads south.
- Entering the south room you'll find it contains cars and equipment for hauling ore. Get the barrow.
- Return to the tunnel, go east once, then south twice to return to the first intersection.
- Go west once, then north into a strong room where there sits a massive mithril ingot. While it's too heavy to carry normally, having the barrow will allow you to take it with you.
- Return to the intersection and retrace your steps back up the spiral stairs to the First Chamber.

Getting out
- Once you're back in the First Chamber you'll find that the door leading east to the main passage has been closed and locked, so you'll have to find another way out.
- Go west twice down the main passage.
- Go south into the records chamber and south again to reach a T-intersection.
- Go east three times through the tunnels to where a door leads north.
- The north room is filled with defaced carvings and a slumbering cave troll who wakes when you enter. Slay the troll, then examine the carvings to find a hidden passage leading north.
- Take the passage north into another chamber of carvings, then go north again and you'll be back in the main passage.
- Follow the passage east, descend the Dimrill Stair, and cross the bridge to return to the main entry hall. From here you can leave by the same inconspicuous path you followed when you arrived: go south then east through the side door.
- Return to Lothlórien where Galadriel will reward you for successfully retrieving the ring.
Location
The Dwarven realm of Moria consists of a vast network of chambers, halls, and mines built beneath the central peaks of the Misty Mountains of Middle-earth, situated northwest of Lothlórien where the story begins. The adventurer's party departs the forest by traveling north from Lórien through the plains, then turning west and climbing up through the foothills and a mountain pass, emerging into Dimrill Dale on the eastern shore of lake Mirrormere.
Trivia
- Nathan Segerlind's adventure The Bridge of Catzad-Dum, set in a satirical version of Moria, features a brief cameo by the main characters: "An elf, a dwarf and an adventurer much like yourself pass through. They ignore you completely, as they seem to be intent on some 'Thror's ring' or something."
- In The Fellowship of the Ring, the Dimrill Stair is not a feature of Moria but instead is the name given to the easternmost section of the Redhorn Pass that leads down into Dimrill Dale.
- Killing a dragon by firing an arrow into its exposed belly is how Bard the Bowman defeated Smaug in The Hobbit.
- In Tolkien's tales, the Ring of Thrór passed from Thrór to his son Thráin, who during an attempt to reclaim the kingdom of Moria was captured by Sauron's forces and taken to the dungeons of Dol Guldur where Sauron took the ring from him.
- Miruvor is a reviving cordial used by the Elves. In The Lord of the Rings Elrond gives a flask of miruvor to Gandalf who later uses it to revitalize the fellowship during their attempt to cross Caradhras.
- The blindworm, which occupies the low room in the upper halls, is not a Tolkien creation but features in the Dangerous Journeys roleplaying game by Gary Gygax.
- Author and developer Derek Jeter maintains a playable, online version of the Eamon Deluxe version of Thror's Ring at his website, using a JS-DOS-powered version of DosBOX.
External links
- EAG Online: Master List
- Eamon Adventure Browser: Thror's Ring
- The Interactive Fiction Database: Thror's Ring
- Interactive Fiction Reviews: Thror's Ring
- The Unofficial Home Page of Eamon Games: Thror's Ring
- Play It Online! (JSDOS Port By Derek Jeter)
| |||||||||||