Shift Change at Grimmwax
| Shift Change at Grimmwax | |
|---|---|
| ◄Eamon adventure #190► | |
 | |
| Authors |
David Sparks Andrea Sparks |
| Released | March 1990 |
| Revised | 13 January 1990 |
| EAG number | 190 |
| EDX number | 16-12 |
| EDX set | Classic Eamon Adventures, Vol. 4 |
| Native format | Apple DOS 3.3 |
| File | Eamon 190 - Shift Change at Grimmwax.dsk |
Shift Change at Grimmwax is an Eamon adventure written by husband-and-wife authors David Sparks and Andrea Sparks and was released in March 1990. A second adventure credited only to David (The Ruins of Belfast) was released at the same time.
Premise
From the introduction:
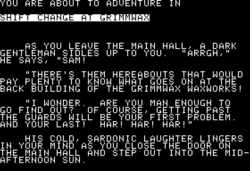
As you leave the Main Hall, a dark gentleman sidles up to you.
"Arrgh," he says, "there's them hereabouts that would pay plenty to know what goes on at the back building of the Grimmwax Waxworks! I wonder, are you [man/woman] enough to go find out? Of course, getting past the guards will be your first problem. And your last! Har! Har! Har!"
His cold, sardonic laughter lingers in your mind as you close the door on the Main Hall and step out into the mid-afternoon sun.
Walkthrough
Shift Change at Grimmwax is more about exploration and puzzles than combat, and the relatively few encounters with enemies never end with death but with the opponent merely being knocked unconscious. Even your adventurer gets knocked out when taking too much damage and revives some time later with full health, having been picked up by the plant guards, stripped of belongings, and returned to the main factory floor. (Certain items you've taken from the plant will be returned to their original positions; others will just disappear.)
Your mission in the plant is vague: just explore the premises, find out whatever you can about what's going on, and return with as much information and loot as possible. The following walkthrough takes you through nearly every room, skipping only a few empty dead-ends, and gives you the opportunity of collecting every artifact, though doing so in some cases may be risky.

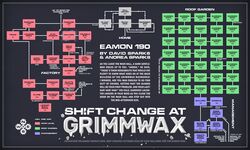
Factory
You begin on an east-west road on the prairie, with a path south that returns you to the Main Hall.
- Go west to the plant gate, overpower the guard, and take his stun gun.
- Follow the parking lot west and south to the loading dock. Once there, guards will open fire if you try to continue south (or return north), and the truck waiting to the west can't be used until it has a load of sufficient weight.
- Go east into the plant's gymnasium and overpower the workman. The hallway to the east is impassable due to toxic fumes; a stairway leads up but ignore it for now.
- Enter the locker room to the south and open the locker to find gloves, a hard hat, and some coveralls.
- Check the wrecked bathroom to the west and pick up the piece of pipe.
- Go back east through the locker room and onto the factory floor. To the north is an OSHA desk where you can get a gas mask, an important item. (South of the factory floor is a "closet" — in reality an elevator, but not something you need quite yet.)
- Proceed to the east end of the factory where a trundle loaded with wax moulds sits on a north-bound conveyor belt. Push the button and machinery will fill the moulds with wax and transfer the trundle to a cart.
- Follow the conveyor belt north to the trundle bay and get the cart. In you have the gas mask in your inventory you can go west through the fume-filled hallway and back to the gymnasium.
- With the cart you'd now be able to go back to the loading dock and board the truck, but you haven't yet learned what's in the back building, so take the stairs up.
Roof garden
You find yourself at the west edge of an expansive rooftop rose garden, its paths laid out in a 5x7 grid. A protective gardener patrols the paths through the flowers: if you encounter him and try to move on, he'll escort you all the way through to the end of the path, but since this makes you miss a couple of important artifacts hidden in the garden it's best to knock out the gardener immediately if you encounter him.
- From the gate at the top of the stairs, go N, N, E, N, E, E, S, S, W, S (where you'll hear music), S, W, S, E, E, E, N, W, and finally N. Here the path ends with a weathered music box playing old radio songs. Open the box to discover a platinum key.
- Go S, E, N, N, N, and N to the end of another path where you'll find a gold bug on a leaf.
- Go S, S, S, S, S, W, W, W, S, and E to reach the south gate of the garden.
Management and hangar
- Go south and you'll enter a "bullpen" office area filled with cubicles and busy workers (and a junior executive whom you may need to knock out).
- East is a window area where the workers have set things up for a going-away party, with a cake and a gold watch. If you're strong, well-armed, and fancy a challenging fight, take the items and return to the bullpen; a mob of workers, outraged by your pilfering, will attack you.
- South from the bullpen is the office of secretary Molly Glitch where you can pick up an obsidian letter opener.
- Go east into the president's office. Get the model plane, and take the toothbrush from the washroom to the west.
- Take the stairs down and you'll be at the entrance to an aircraft hangar.
- Go north into the pilot's lounge, knock out the pilot, and take his black box. The platinum key you collected in the garden will open it, revealing a precious dilithium crystal.
- Return to the hangar. Another valuable artifact may be obtained to the west but the area is hazardous since there's a chance than an automated stun gun system in the ceiling will hit you and knock you out. If you prefer to leave with what you've already collected, jump to the next section. If you prefer to chance it, head west.
- At the west end of the hangar you'll find a high-tech, prototype stealth aircraft, along with the valuable construction blueprints. You can put the dilithium crystal in the slot in the aircraft, but nothing happens so it's better to keep it.
Escape
- Retrace your steps to the president's office.
- Go north into the "closet". Per the clues on the sign, you can
SAY FIBBER MC GEEto activate the elevator, which will take you down to the factory floor, bypassing the need to return through the rose garden. - Make your way back to the loading dock; if you still have the cart then you can enter the truck. (If not, you can repeat the process by pressing the button again at the factory's conveyor belt.)
- Go north, then east, out the plant gates, and onto the road.
- So south and your mission is complete.
Sam Slicker will pay you for whatever treasures you've found, plus 200 gold if you returned with the truck. The most valuable artifacts and their base values are the model plane (300 gold), the guard's stun gun (500), the dilithium crystals (750), and the blueprints for the aircraft (1000). If you don't bring back the crystals, Sam will encourage you to do so next time.
Trivia

- The pass-phrase that activates the elevator ("Fibber Mc Gee") is a reference to Fibber McGee and Molly, a popular and long-running comedy program on the NBC radio network. The program was officially titled The Johnson Wax Program since it was sponsored by S. C. Johnson as a way to market their wax products.
- The name "Grimm" may be inspired by another popular NBC radio drama, Arnold Grimm’s Daughter, aired in the 1930s and '40s.
- OSHA (the Occupational Safety and Health Administration) is a US agency established in 1970 that regulates workplace safety.
- Dilithium crystals are used in the engines of space vessels in Star Trek.
- One room in the plant — #13, a locked bathroom — is inaccessible. The Main Program code shows that the authors intended to write a routine for the adventurer to find a means of escaping it, but seemingly the sequence was never completed. (A remarks says that it's "to be added someday.")
External links
- EAG Online: Master List
- The Interactive Fiction Database: Shift Change at Grimmwax
- Interactive Fiction Reviews: Shift Change at Grimmwax